PAYROLL
Cancelling leave already linked to payroll
Leave that is booked and is already linked to a finlised/locked payroll can be cancelled.
Considerations:
- When leave is already "linked" to a payslip the user is only allowed to cancel, and not edit. In this case, the pencil icon doesn't show. The user can only edit leave that is not yet linked to a payroll.
- The user may cancel all leave types, however they must have Manage Payroll permission in order to cancel Sick and Injury leave, and also any Half pay or Unpaid leave, given that these may have payroll implications.
- The normal flow of leave approval applies. That is, if the user doesn’t have self approval, then booking additional leave or requesting to cancel existing leave will require approval as per normal circumstances.
- If a person with no Self approve leave cancels existing leave, then they need to wait for it to be approved (i.e approve the cancellation) in order to then book more hours on the same day. Otherwise if we allow them to book before the leave is cancelled we end up with two duplicate leave records.
- The user may add a note to explain why they are cancelling leave.
- When leave is cancelled, the leave balance is automatically updated in the employee Leave Balance pod, however the Leave Hours and the Leave Balance to date in payslips and payroll reports, will not be updated.
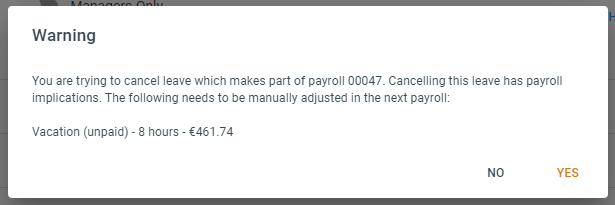
- Cancelling Unpaid or Half pay leave (any leave type) has payroll implications. Therefore in these cases, we show the user the amount that need to be adjusted in the following payslip. This adjustment needs to be done manually.
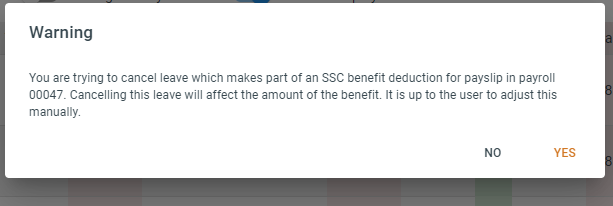
- Cancelling Sick or Injury leave has payroll implications when the Sickness or Injury Benefit Deduction is affected. Therefore in these cases, we show the user a warning in order for adjustments to be made in the following payslip. This adjustment needs to be done manually.
Bulk uploads - Adjustments
You can upload Adjustments to payroll in bulk by filling out the Bulk upload template. A template is to be downloaded for every client and payroll to which you would like to upload your hours to. This is because the template itself would automatically include the payroll number and a list of employees added to the payroll.
Please note that the employees need to be first added to the payroll in order to download the template.
To download the template:
- Go to the relevant payroll
- Click on Edit
- Choose Bulk Edit from the drop down menu
- Go to the Adjustments tab
- Click the blue Bulk Upload button
- Click Download Template
Within the template you will notice that that there are 3 tabs:
- Adjustment
- EmployeeCode
- BenefitCode
You will need to fill out the first tab only, by picking the relevant information from the drop downs provided within the template.
To fill out the template:
- PayrollStart - this is the payroll period start date of the payroll roll that this information will be uploaded to
- PayrollEnd - this is the payroll period end date of the payroll roll that this information will be uploaded to
- Employee code - this is the employee that this information will be uploaded to
- BenefitCode - The code linked to the benefits you have saved on your system. You may confirm these codes by going to Settings > Benefits > Code column
- Amount - Amount as adjustment, that you would like to add to this specific payroll
To upload the template:
Once filled in, you may upload the template:
- Go to the relevant payroll
- Click on Edit
- Choose Bulk Edit from the drop down menu
- Go to the Adjustments
- Click the blue Bulk Upload button
- Click Upload Adjustments
All the information within the template will now be shown in the pop Edit pop up, Adjustments tab. Please click Save to confirm the details and upload the date to payslip calculations.
You may re-upload the same file more than once. Please note that re-uploading the same file with the same employees but different data, will be overriding any existing data for the same employee.
If the same file includes multiple records of the same Adjustment (BenefitCode) for the same employee, the amounts added will be aggregated and final amount will show once in the confirmation window - this applies for both negative and positive adjustments. Example:
ALLOW - Jane Doe - 200
ALLOW - Jane Doe - 300
In the confirmation window you will see:
ALLOW - Jane Doe - 500
In the case of married employees who therefore have more than one payslip within a given month, the special rate/overtime will show in the relevant payslip based on the date added in the “DateWorked” column in the template.
Covid Wage Supplement
The following information serves as a guide. For an accurate or updated source of information kindly refer to DIER or Malta Enterprise.
There are two types of supplements companies are eligible for based on their NACE (business activity). The final/actual supplement amount will be provided by Malta Enterprise per employee, so not all employees may be eligible, or eligible for the full amount.
LEAVE
Bulk Upload - Leave
You can upload Leave booked by employees in bulk by filling out the Bulk upload template. A template is to be downloaded for every client because the template itself would automatically include the employee numbers and leave types available for that client.
To download the template:
- Go to the Leave page
- Click on Bulk Upload
- Click Download Template
Within the template you will notice that that there are 4 tabs:
- Leave
- EmployeeCode
- LeaveType
- PayType
You will need to fill out the first tab only, by picking the relevant information from the drop downs provided within the template.
To fill out the template:
- Employee code - this is the employee that this information will be uploaded to
- LeaveType - this is the type of leave that you would like to book (Ex. Vacation, Sick etc)
- DateFrom - this is the date on which the first leave record needs to be booked
- DateTo - if the date is the same as the DateFrom, the DateTo can be left empty. If you are booking more than one day at a stretch for the employee, then please fill out the DateTo
- TimeFrom - this is to be filled in only if the leave booked IS NOT full day. That is, if the person is booking a number of hours of leave, please add the start time. If it is full day then the relevant number of hours of leave will be deducted based on the job schedule of the person. This also needs to be filled in, when booking leave for those on irregular/casual work.
- TimeTo - this is to be filled in only if the leave booked IS NOT full day. That is, if the person is booking a number of hours of leave, please add the end time. This also needs to be filled in, when booking leave for those on irregular/casual work.
- PayType - this is the rate at which you would like to pay your employee when booking leave. You can select FULL Pay, HALF Pay or Unpaid. Once uploaded, the system will automatically give you the right Pay type based on the balance of the employee regardless of the Pay Type added in the template. Therefore you may add “Full pay” in the template.
- Comment - this will be saved as a note with the leave record
To upload the template:
Once filled in, you may upload the template:
- Go to the Leave page
- Click on Bulk Upload
- Click Upload Template
All the information within the template will now be shown a separate window, with a breakdown for each employee. The Pay type will be updated to full, half or unpaid based on the existing balance of the employee at the time up load. You may make adjustments in this window. Please click Save to confirm the details and upload the leave successfully.